Instalar heroku cli
Instalamos heroku CLI siguiendo las instrucción de su web
Creamos la aplicación
$ mkdir heroku-bot
$ cd heroku-bot/
$ heroku create
Creating app... done, ⬢ stark-lake-74962
https://stark-lake-74962.herokuapp.com/ | https://git.heroku.com/stark-lake-74962.git
$ git init
Initialized empty Git repository in /tmp/heroku-bot/.git/
$ heroku git:remote -a stark-lake-74962
set git remote heroku to https://git.heroku.com/stark-lake-74962.git
$ heroku buildpacks:set heroku/python
Buildpack set. Next release on stark-lake-74962 will use heroku/python.
Run git push heroku master to create a new release using this buildpack.
Creamos el bot
$ sudo pip3 install sleekxmpp
$ wget -1 https://raw.githubusercontent.com/fritzy/SleekXMPP/develop/examples/echo_client.py
$ pip3 freeze | grep -i sleekxmpp > requirements.txt
Configuramos el proyecto
a) Editamos el bot (echo_client.py) para que funcione con variables de entorno
    if opts.jid is None:
        opts.jid = os.environ["XMPP_USER"]
    if opts.password is None:
        opts.password = os.environ["XMPP_PASS"]
b) Creamos las variables de entorno con los datos del usuario que vamos a utilizar
$ heroku config:set XMPP_USER=ejemplo@bot.com
Setting XMPP_USER and restarting ⬢ stark-lake-74962... done, v3
XMPP_USER: ejemplo@bot.com
$ heroku config:set XMPP_PASS=passejemplo
Setting XMPP_PASS and restarting ⬢ stark-lake-74962... done, v4
XMPP_PASS: passejemplo
c) Le indicamos a heroku que tiene que arrancar al desplegar
$ echo "worker: python3 echo_client.py" > Procfile
Desplegamos
$ git add .
$ git commit -m "Echo bot"
$ git push heroku master
Arrancamos el bot
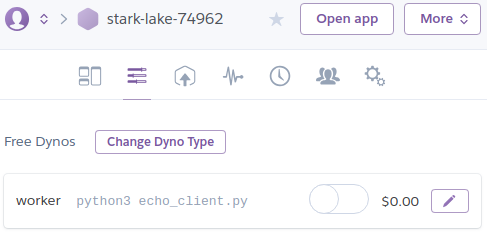
Este punto no lo tengo del todo claro. La primera vez que lo hice vi
que al desplegar no se arrancaba el bot automáticamente, así que entre
en el portal web de administración de heroku y me di cuenta de que el
dyno estaba desactivado:
así que lo active manualmente:
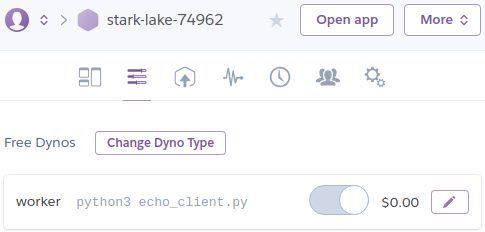
y el bot arranco. Pero para estos apuntes quise hacerlo todo desde linea de comandos, así que tras varias pruebas vi que llegaba al mismo resultado haciendo:
$ heroku ps:scale worker=1
Scaling dynos... done, now running worker at 1:Free
$ heroku ps
Free dyno hours quota remaining this month: 548h 15m (99%)
Free dyno usage for this app: 0h 0m (0%)
For more information on dyno sleeping and how to upgrade, see:
https://devcenter.heroku.com/articles/dyno-sleeping

=== worker (Free): python3 echo_client.py (1)
worker.1: up 2019/02/20 17:47:07 +0100 (~ 3s ago)
Bonus 1: Añadir servidor web
Según algunos blogs heroku espera que haya un servidor web y si no
lo encuentra puede pensar que la aplicación esta fallando y por lo tanto
pararla. A fin de evitar esto recomiendan añadir un servidor web aunque
sea de pega.
a) Instalamos y añadimos las dependencias
$ sudo pip3 install flask
$ pip3 freeze | grep -i flask >> requirements.txt
b) Creamos el servidor (server.py)
from os import environ
from flask import Flask

port=int(environ.get('PORT'))

app = Flask(__name__)

@app.route("/")
def hello():
    return "Hello World!"

app.run(host= '0.0.0.0', port=port)
c) Lo añadimos a Procfile
$ echo "web: python3 server.py" >> Procfile
d) Desplegamos
$ git add .
$ git commit -m "Echo bot with web server"
$ git push heroku master
El dyno de web si que se arranca solo, pero el dyno de worker
seguirá necesitando ser arrancado a mano.
Bonus 2: Probar en local
Para probar proyectos heroku en local basta con hacer heroku local
pero como nuestro proyecto depende de variables de entorno, y no queremos
tener que meterlas en nuestra máquina o pasarlas por comando cada vez que
probemos, crearemos un fichero .env con dichas variables para que heroku
las simule en la prueba local. Al ser información sensible debemos también
excluirlo del proyecto git.
$ heroku config:get XMPP_USER XMPP_PASS -s > .env
$ echo ".env" > .gitignore
$ heroku local
[OKAY] Loaded ENV .env File as KEY=VALUE Format
20:03:47 worker.1   |  INFO     ...
Fuentes: emcain - dev.to, anshulc95 - boostlog.io